Diamond Painting has been around for a few years now. You either love it or hate it. I wasnt sure which boat I would fall into to be honest. I had seen it around a lot but had never been super interested until now. I was too busy juggling working, running a business, raising a daughter and just generally trying to keep my head above water.
That all changed when I found myself with some time off work and was looking for something to do. I needed something that would keep me entertained as well as distracted enough to actually take time off over the Christmas and New Year period. I have always been interested in arts and crafts and over the years I have tried everything from folk art to cross stitch. So giving diamond painting a go wasn’t a big stretch for me.
I live in regional Queensland so I wasn’t sure how much luck i would have finding any kits local. We don’t even have a craft store any longer so I decided my best bet might be to try the cheap shops first. And I got lucky! The very first shop I went to had a range of partial and full round drill diamond painting kits that I could choose from.
I had my 6 year old daughter with me as well and she had a great time looking through the various designs with me. She decided on a couple of unicorn designs (no big surprise there…) and I found a few that I thought were interesting enough that would be a good introduction to diamond painting for me.
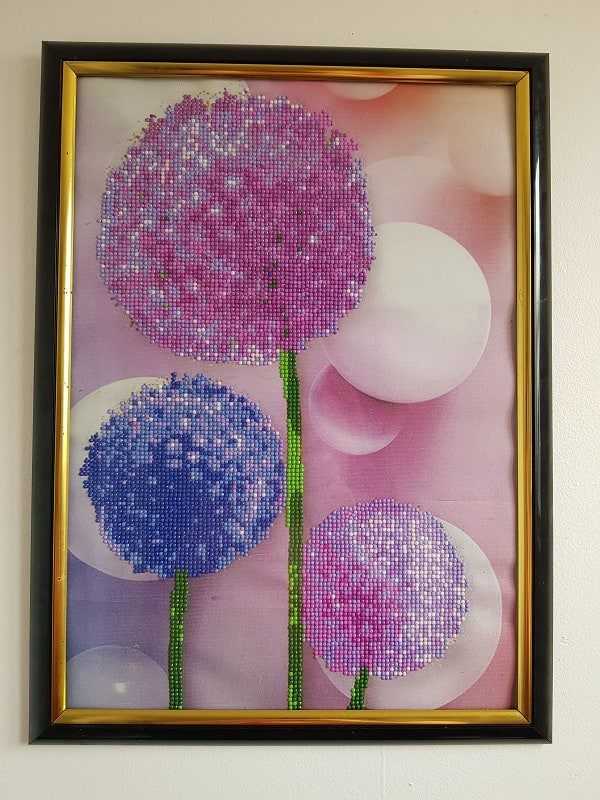
I decided that my first one would be a partial round drill kit that was 35cm x 45cms and had a dandelion fuzzy seed head type design (technical description I know). Pretty but straightforward in my mind.
I had watched a few videos on YouTube about diamond painting and saw that the hobby can get pretty crazy with the amount of storage options and hints and tips that are out there. I had decided that rather than go crazy, I’d start pretty simple. All I bought was the diamond kits and some little zip lock bags that I could store the different drill colours in. That’s it. No light pads, no fancy containers, no special angled drawing tables.
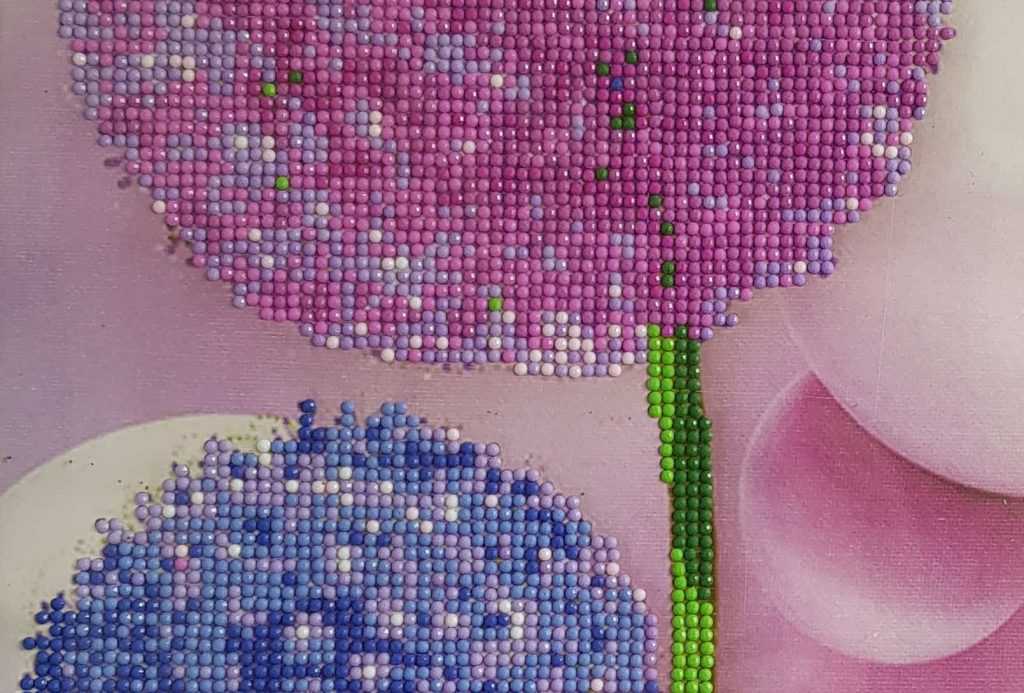
I opened the kit and it included the round drills, a tray, the canvas, a drill pen and a small bit of red wax. The kit only included 12 different colours so I broke them out into individual zip lock bags and wrote the colour and code on the outside of the bag, so I could easily identify the ones I was looking for each time.
I started around lunch time and pretty much instantly got hooked. The kit I bought was only a cheap one so the glue was a little dodgy at times but overall was Ok. I worked while sitting on my couch watching Netflix with the canvas on the coffee table in front of me and a little desk light to help me see. I have some vision and depth perception issues which means it’s sometimes a little bit interesting aiming for the tiny little drills. I can’t remember how many times I misjudged and knocked the drill tray flying and had a hundred drills to pick back up.
I worked late into the night because I’m a bit of a night owl and I can’t sleep very well. So I probably worked a good 8-10hrs during the first day. I spend another 5hrs the next day on it and finished around 3pm.
I was lucky and had an old frame hanging around that was the perfect size for the canvas. So I cut the image to size and framed it up. Despite it not being a huge piece, because of the simple design it still looked amazing. Sometimes size isnt everything.
I hung up the design in my toilet of all places but it make it look so fancy now. I really enjoyed my first diamond painting experience. So much so I went back and bought a few more kits from the cheap shop as well as jumped onto AliExpress to see what I could find on there too.
Safe to say I am officially a diamond painting addict.